
Jewelry Laser Marking & Engraving Applications
Evaluate laser marking and engraving for rings, pendants, charms, bracelets, bangles and precious-metal jewelry by defining the material and finish, target mark result, geometry and handling method first, then confirming the laser route, acceptance criteria and final machine configuration through sample testing.
Request a QuoteContact Zhuorui Laser- Rings and curved pieces
- Personalization and batch work
- Sample-validated configuration
Which jewelry products use laser marking and engraving?
Start with the workpiece type because access, curvature, finish and holding method often change before the laser source does. Use the route that best matches the jewelry geometry and marking task.
Gold, silver and precious-metal jewelry
Use this route for jewelry-specific decisions involving gold, silver and other precious-metal pieces, including alloy, finish and surface-response differences.
Open precious-metal jewelry routeRing inside and outside marking
Use this route when ring access, rotary support, focus and inner-wall constraints drive the setup.
Open ring marking routeBracelet and bangle marking
Use this route for curved surfaces, diameter variation, clamping constraints and repeatable holding.
Open bracelet and bangle routeJewelry hallmarking
Use this route for hallmark-style content, mark size, readability, validation and compliance-boundary discussions.
Open hallmarking routePersonalized jewelry engraving
Use this route for names, dates, artwork changes, small-batch customization and quick changeover.
Open personalization routeOther laser marking applications
Return to the broader application directory when the workpiece is not jewelry or precious metals.
View all applicationsWhy are jewelry products marked or engraved?
The reason for marking should be defined before the artwork and machine configuration. Personalization, brand identification, product identification and decorative engraving create different requirements for appearance, readability, repeatability and production flow.
Personalization
Names, dates, initials and short messages require frequent data changes and reliable positioning on individual pieces.
Brand and maker identity
Logos and maker marks require fine artwork, consistent placement and enough contrast or depth to remain recognizable on the actual finish.
Identification and traceability
Serial numbers, batch identifiers or machine-readable data may require minimum character or code quality under the buyer’s actual reading conditions.
Decorative engraving
Patterns and ornamental details may prioritize surface appearance and edge quality rather than the same criteria used for identification marks.
What is usually marked on jewelry?
The mark content changes the required detail, data workflow and inspection method. Very small text or data marks should be evaluated on the actual jewelry surface rather than judged only from artwork on screen.
Logo and maker mark
Small logos require clean focus, suitable artwork, enough readable area and stable workholding. Fine detail should be tested on the buyer’s actual surface.
Names and dates
Personalized jewelry often needs frequent data changes, easy artwork import and repeatable positioning across one-off or small-batch jobs.
Serial and data marks
Very small serial numbers or QR/data marks should be evaluated for readable size, contrast, scanner condition and post-mark handling.
Hallmark-style symbols
A laser may create readable symbols when material, finish and geometry allow it, but legal hallmarking approval must be confirmed separately for the applicable market and product.
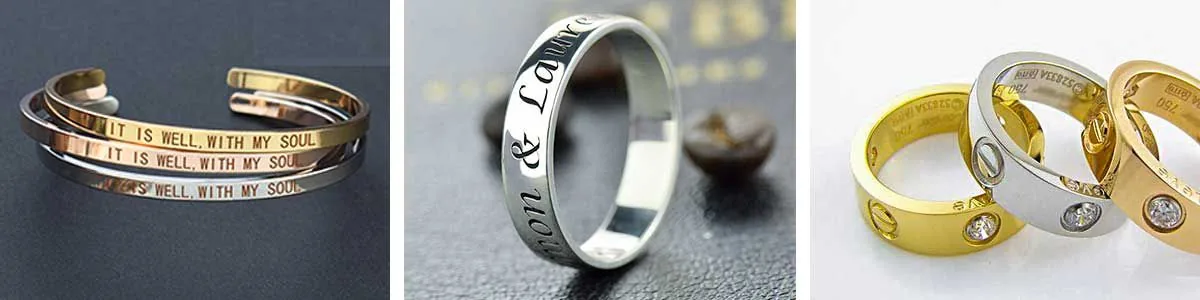
What determines the laser marking result on jewelry?
Jewelry should not be evaluated by material name alone. The result is controlled by the combination of alloy and surface condition, mark requirements, geometry, process setup and the way the part is loaded and inspected.
Material and surface
Gold, silver, platinum-family jewelry, stainless or titanium accessories, solid versus plated construction, and polished, brushed, oxidized, coated or textured finishes can respond differently.
Mark size and detail
Character height, line width, logo detail, code size, required depth and the available marking area affect the process window and inspection method.
Geometry and access
Flat faces, ring interiors, outside curves, sidewalls and irregular surfaces change focus, field access, rotary needs and fixture design.
Production conditions
One-off versus batch work, fixture repeatability, artwork changes, variable data, cleaning, post-polishing and required cycle time can change the final system configuration.
Questions to answer before testing
- Is the part solid metal, plated, coated or surface-treated?
- Is the actual finish polished, brushed, oxidized, textured or otherwise appearance-sensitive?
- What is the smallest required feature and available mark area?
- Is the target primarily contrast, depth, decorative appearance, readability or durability?
- Will the part be cleaned, handled, worn or polished after marking?
What marking result should you target?
A suitable laser route cannot be chosen until the required result is defined. A decorative monogram, a fine serial number and a deeper engraving on a ring may all use different acceptance criteria even when the base material is similar.
Appearance and contrast
Define the acceptable visual effect on the actual finish, including whether the priority is visible contrast, subtle tone, edge quality or a decorative surface effect.
Depth and surface change
Define whether the requirement is surface marking, shallow engraving or a buyer-specified material-removal result, and what surrounding surface change is acceptable.
Detail and readability
Specify the smallest text, logo feature or code that must remain readable under the actual viewing or scanner condition.
Position and consistency
Define allowable position variation on the part, especially for ring interiors, outside curves, repeated batches and multi-piece fixtures.
Post-process durability
Define what must remain acceptable after cleaning, handling, light wear simulation or buyer-defined post-polishing steps.
Cycle requirement
Separate marking time from the complete handling cycle. Loading, alignment, data change, inspection, cleaning and unloading may determine practical throughput.
How do jewelry shape, loading and workholding affect the setup?
Flat pendants and charms may be evaluated with a flat-field marking setup and a small locating fixture. Ring outside marking may require a rotary axis when the mark must follow the circumference or remain consistent around a curved band. Ring inside marking requires more careful access, focus control, fixture design and validation.
Bracelets and bangles introduce larger diameter variation, curved surfaces and clamping limitations. Small loose components may require nests, trays or repeatable locating fixtures when the same mark must be reproduced across a batch.
Protect the jewelry surface
Fixture contact points should be evaluated for scratch, dent or deformation risk, especially on polished or soft precious-metal pieces.
Control the mark position
The fixture or rotary method should make the required marking area repeatable without forcing the operator to visually re-center every piece.
Match handling to production mode
One-off personalization may favor quick manual loading, while repeated batches may justify nests, trays or a more controlled locating method.
Which laser route should be tested first for jewelry?
For many metal jewelry tasks, fiber laser marking is a practical first evaluation direction. The purpose of testing is not to choose the highest power or most complex source, but to find the process window that meets the required appearance, detail, depth, surface condition and cycle target.
Start with fiber on the actual metal and finish
For many metal jewelry tasks, a fiber laser is the practical first route to evaluate on the representative alloy, plating or finish.
Review fiber laser marking machinesCompare Q-switched and MOPA only when the target justifies it
Q-switched fiber and MOPA fiber may both be relevant. Compare them when pulse-control flexibility could materially affect the required appearance, surface response, detail or process window.
Choose by the accepted result, not power alone
Judge the route against the defined appearance, depth, detail, surface condition and complete cycle requirement. Higher power or a more complex source is not automatically the better jewelry configuration.
What are the common jewelry laser marking failure modes?
A sample can look acceptable at first glance and still fail because of focus, surface sensitivity, fixture contact, post-polishing or batch repeatability. Identify these risks before final machine configuration.
Uneven mark on a curve
Curvature, focus change, rotary alignment or unstable holding can cause inconsistent appearance around a ring or bracelet.
Fine detail loses definition
Text or logo features may become unclear when the mark is too small for the selected field, artwork, focus condition or process window.
Surface or plating damage
Excessive process intensity or unsuitable settings can produce unacceptable surface change, coating breakthrough or appearance variation.
Fixture marks the jewelry
Clamping or contact surfaces can scratch, dent or deform polished and softer pieces even when the laser mark itself is acceptable.
Position varies from piece to piece
Loose loading, diameter variation or poor locating features can make an otherwise good mark fail the buyer’s position tolerance.
Data mark cannot be read reliably
A visually present code or serial mark may still fail the buyer’s actual scanner, reader or viewing condition.
Post-polishing weakens the result
Cleaning, polishing or later finishing can change appearance or reduce the effective depth of a mark that looked acceptable immediately after marking.
Batch cycle is too slow
Manual loading, artwork change, alignment, cleaning and inspection can dominate throughput even when the laser exposure itself is fast.
How does jewelry marking move from a sample into production?
The production configuration should be built around the complete workflow, not only the laser marking step. Loading, locating, data changes, inspection, cleaning and reject handling can be as important as the marking cycle.
1. Prepare artwork or variable data
Load the correct logo, name, date, serial or batch data and define how the operator verifies the active job before marking.
2. Load and locate the jewelry
Use a manual locating fixture, rotary support, tray, nest or other approved holding method that protects the surface and controls position.
3. Mark with the approved recipe
Use the validated laser route, focus condition and process recipe for the defined material, surface and target result.
4. Verify the result
Inspect appearance, mark position and readability under the buyer-defined condition; use the actual scanner or reader when machine-readable data is required.
5. Clean or post-process
Apply the agreed cleaning or post-polishing sequence before final acceptance when those steps affect the surface or the mark.
6. Accept, reject or rework
Define what happens when the piece falls outside the agreed appearance, position, readability or surface condition.
7. Unload and protect the part
Remove the jewelry without scratching the finished surface and maintain separation or protection if pieces can contact each other.
8. Repeat with controlled changeover
For batch or personalization work, define how recipes, artwork, fixtures and data change without creating mix-ups or inconsistent results.
One-off and personalization
- Frequent artwork or text changes
- Fast manual loading and simple locating
- Operator-friendly job confirmation
- Low risk of scratching high-value finished pieces
Repeated batch production
- Repeatable nest, tray or rotary loading
- Stable recipe and fixture control
- Defined verification and reject flow
- Cycle time measured across the complete workflow
What should a jewelry sample test prove before machine selection?
Provide representative samples or clear sample photos showing the actual material, surface finish, size, curvature and required mark content. The test should produce a record that can be accepted or rejected against the buyer’s defined result and production conditions.
Sample acceptance should document
- Appearance, contrast, depth or other agreed surface result under defined viewing conditions.
- Readable text, serial numbers or data marks under the buyer’s actual scanner or reader conditions when applicable; this is not the same as formal verifier certification unless a verifier standard is specified.
- Surface condition after cleaning, handling, light wear simulation or buyer-defined post-processing.
- Mark position, fixture repeatability and observed variation across more than one loading cycle when repeatability matters.
- Complete cycle behavior including loading, marking, inspection, cleaning and unloading when production throughput matters.
- For soft precious metals, contact-surface protection, scratch or dent risk, material loss or particle collection needs and post-polishing appearance before release.
How do sample-test results determine the final machine configuration?
The final machine should be the simplest configuration that reliably meets the accepted result and production workflow. Each upgrade should answer a problem observed in testing or a defined production requirement.
If a standard fiber route already meets the target
Keep the simpler validated source route rather than upgrading only for specification value. Confirm the lens, field, working distance and process recipe that produced the accepted sample.
If MOPA testing provides the required process window
Use MOPA when the tested pulse-control flexibility is needed to meet the buyer’s accepted appearance, heat-input or surface-response requirement.
If curvature causes focus or position variation
Add the rotary, fixture or 3D route that solved the verified geometry problem; do not add those functions when the accepted part can be handled reliably without them.
If manual placement is not repeatable enough
Use a dedicated nest, tray, custom fixture or possible vision-positioning route when testing shows that loading variation is the limiting factor.
If small detail cannot meet acceptance in the current field
Re-evaluate marking field, lens, working distance and optical setup before assuming that higher laser power is the correct solution.
If data verification is part of acceptance
Include the required artwork or variable-data workflow, scanner/reader step and pass/fail handling in the final software and operating process.
If handling dominates cycle time
Improve fixture loading, tray handling, job changeover or the appropriate level of automation before treating laser scan speed as the only throughput constraint.
If the production review identifies safety or fume-control requirements
Carry the verified enclosure, interlock, workpiece-orientation and extraction or filtration requirements into the quoted system configuration.
If the project requires a custom or OEM package
Use the validated process and workflow as the basis for custom laser marking machine design or OEM/ODM manufacturing evaluation.
Jewelry laser marking questions
Can a laser mark gold and silver jewelry?
Yes, many gold and silver jewelry marking tasks can be evaluated with a fiber laser marking system. The exact result depends on alloy, finish, surface condition, geometry, mark size and sample testing.
Is fiber laser the only option for jewelry marking?
Fiber laser is a common evaluation direction for many metal jewelry tasks. Other laser sources should only be discussed when the material, surface or process requirement supports that direction.
Is MOPA always required for jewelry marking?
No. MOPA fiber may be evaluated when pulse-width flexibility is useful for contrast, heat input or surface effect, but it should not be treated as automatically required for every jewelry job.
Can the machine mark inside a ring?
It may be possible with suitable fixture or rotary support, but inside-ring marking must be tested for access, focus, field size, holding stability and mark readability.
Can laser marking replace legal hallmarking approval?
Laser marking can create readable symbols or hallmark-style content, but legal hallmarking approval must be confirmed separately for the applicable market and product.
Can Zhuorui guarantee final contrast or cycle time before testing?
Final contrast, depth, surface effect, durability and cycle time should be confirmed by sample testing on the buyer’s actual material, finish, artwork and acceptance criteria.
What should I send for quotation?
Send jewelry photos or samples, material and finish details, mark artwork or text, target mark position and size, expected quantity, production workflow and acceptance criteria.
Send the jewelry piece, mark artwork and batch requirement before selecting a machine
Zhuorui can evaluate the initial laser route, fixture or rotary needs, sample acceptance criteria and final machine configuration from the actual jewelry material, finish, geometry, target result and production workflow.
Request a Jewelry Marking QuoteDiscuss OEM / ODM Supply