
Jewelry Application Guidance
Ring Laser Engraving: Inside and Outside Marking
Plan ring laser engraving from the real ring: alloy and finish, inside or outside mark position, required appearance, ring geometry, holding method and production mode. Use representative samples to compare the laser route, then let the accepted test result determine the final machine configuration.
Ring Types / Product Scope
Which Rings and Ring Engraving Jobs Does This Page Cover?
This page is for ring workpieces where the mark, the curved geometry and the surface finish must be evaluated together—not for jewelry marking in general.
Wedding & Band Rings
Inside names, dates or identifiers and outside logos or decoration can require different access, focus and holding strategies even on the same ring.
Signet & Wide Rings
Wider or non-uniform profiles change the usable mark area, focal tolerance, orientation and fixture contact points.
Polished, Brushed, Plated or Textured Rings
The visible finish can be as important as the engraved content. Sample testing should confirm whether the required appearance can be produced without unacceptable surface change.
Single-Piece & Batch Ring Jobs
One-off personalization and repeat batch production may use the same laser route, but they can need different fixture, changeover, data and verification workflows.
Marking Purpose & Content
Why Are Rings Marked, and What Is Usually Marked?
The reason for marking and the content being marked are different decisions. Define both before deciding how the ring should be held or which laser route should be tested.
Why Are Rings Marked?
- Personalization: names, initials, dates or short messages for individual pieces.
- Brand or maker identification: logos, maker marks or controlled brand graphics.
- Identification and traceability: serial numbers, production references or other small identifiers when the application requires them.
- Decorative marking: patterns, borders or graphics that become part of the visible ring design.
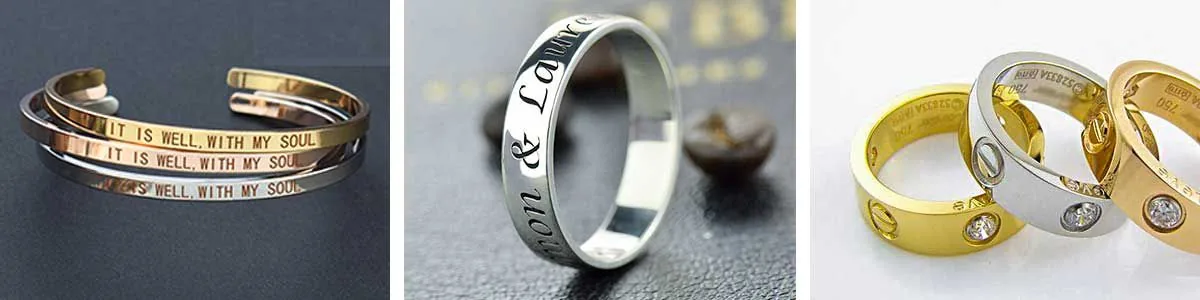
What Is Usually Marked on Rings?
- Names, initials, dates and short text.
- Logos, maker marks and small graphics.
- Serial numbers and other controlled identifiers.
- Decorative patterns, symbols and circumferential graphics.
Result Variables
What Determines Laser Engraving Results on Rings?
A material name alone is not enough to select a process. The result is produced by the interaction of the alloy and finish, the required mark, the ring geometry and the way the part is positioned.
Alloy and Surface Condition
Gold, silver and other metal rings can behave differently by alloy, plating or coating. Polished, brushed, oxidized and textured surfaces also change the acceptable process window and visible result.
Content, Scale and Required Effect
Small text, logos, serials and decorative patterns place different demands on detail, contrast, depth, line width and edge quality.
Diameter, Band Width and Mark Position
Inner diameter, outer profile, band width, curvature and inside/outside/edge location determine access, focal tolerance and whether rotation is needed.
Focus, Rotation and Holding Stability
Rotary concentricity, fixture rigidity, part orientation and focal distance affect alignment and consistency even when the material and laser source stay the same.
Target Result
What Ring Engraving Result Should You Target?
Before comparing lasers, define what an acceptable finished ring should look and feel like. A process cannot be judged only by whether a visible mark appears.
Visual Result
Define whether the mark needs obvious contrast, a subtle same-color effect, a decorative appearance or a controlled engraved look that matches an approved sample.
Surface or Engraved Result
Specify whether the task is primarily surface identification or whether visible/tactile engraving depth is required. Do not assume more depth is automatically better for a finished jewelry surface.
Readability and Edge Quality
Use the smallest real text, logo or identifier to judge whether detail, spacing and edges remain acceptable at the actual mark size.
Surface Preservation
Define how much change is acceptable around the mark, especially on polished, plated, brushed or textured finishes where scratching, heat tint or coating breakthrough may be unacceptable.
Position and Continuity
For inside text, define location and orientation. For outside or circumferential graphics, define alignment, spacing and whether the start/end transition must appear continuous.
Durability When Required
If the project has a durability requirement, state the actual test and acceptance criterion instead of treating “durable” as a universal result claim.
Geometry, Positioning & Part Handling
How Do Ring Geometry, Positioning and Part Handling Affect the Setup?
Inside and outside marking do not create the same access, rotary, fixture or loading problem. The mechanical setup should be evaluated before final laser parameters are approved.
Inside vs. Outside Access
- Outside-band marks may need rotary motion when the mark follows the circumference or spans a curved path.
- Inside-band marks require usable optical access, focal distance and a fixture orientation that does not block the marking path.
- Wide bands and non-uniform profiles should be tested across the real mark path, not only at one easy focal point.
Centering, Orientation and Holding
- Ring center and angular reference should be repeatable when mark orientation matters.
- The chuck or nest must hold the ring without slipping during rotation.
- Contact surfaces should be reviewed so polished or plated areas are not damaged by the fixture.
Loading and Changeover
- Single-piece personalization favors quick loading and easy size changeover.
- Batch work favors repeatable nests, controlled orientation and consistent reference positions.
- A wide ring-size range may require adjustable chucking, interchangeable nests or a defined focus-height procedure.
Laser Route
Which Laser Route Should You Test First?
Choose the first test route from the real ring material, finish and target result. This stage identifies what to test; it does not finalize the complete machine.
Q-Switched Fiber
For many metal-ring text, logo and identifier tasks, a Q-switched fiber laser is a practical starting point for sample evaluation. It may be sufficient when the required mark quality is achieved without unacceptable surface or heat effects.
The correct power and process window should be determined from the actual alloy, finish, mark size and required depth rather than selected from the material name alone.
MOPA Fiber
MOPA fiber sources provide a wider adjustable pulse-control window and can be evaluated when surface appearance, thermal input or process tuning needs finer control. The additional flexibility is useful only if testing shows a measurable benefit for the actual ring and target result.
Do not upgrade to MOPA by default when a simpler fiber configuration already passes the sample-acceptance criteria.
Failure Modes
What Are the Common Failure Modes in Ring Laser Engraving?
Use failure modes to design the sample test. The goal is not only to create a visible mark, but to expose the geometry, finish and handling conditions most likely to fail.
| Failure Mode | Likely Cause to Investigate | What to Check in the Sample Test |
|---|---|---|
| Inside mark is incomplete or hard to read | Limited beam access, focus error or unsuitable mark size | Test the smallest inner diameter and the most difficult inside-band position. |
| Uneven depth or contrast | Curvature, focal variation or inconsistent process conditions | Inspect the full real mark path rather than a single flat or central point. |
| Distorted spacing or rotary drift | Ring eccentricity, chuck slip or rotary calibration | Check character spacing, orientation and repeatability after rotation. |
| Visible start/end seam on circumferential graphics | Artwork preparation, rotary synchronization or positioning error | Inspect the transition where the graphic closes around the ring. |
| Fixture marks or scratches | Hard contact, excessive clamping or unsuitable jaw/nest surfaces | Inspect all fixture-contact areas before and after marking. |
| Plating breakthrough or excessive finish change | Process energy or engraving depth exceeds the acceptable surface window | Compare the marked area and adjacent finish against the approved appearance requirement. |
| Heat tint or unwanted surface effect | Process window does not match the alloy/finish and target result | Compare alternative process settings or laser routes on representative rings. |
| Small text or logo detail is lost | Artwork scale, spot/process combination or focus is unsuitable | Use the smallest real production artwork during acceptance testing. |
Production Workflow
How Does Ring Engraving Move From a Sample Into Production?
A production-ready process includes loading, positioning, data handling, marking and verification. Marking time alone is not the full production cycle.
Prepare the Job
Load the correct artwork or variable data, select the approved recipe and confirm the ring size, material, finish and mark position.
Load and Position
Place the ring in the chuck or nest, protect critical surfaces, establish center/orientation and confirm focus or focus-height procedure.
Mark
Run the approved process. For rotary work, verify that the ring remains secure and that the intended angular path is maintained.
Verify and Release
Inspect mark location, readability, appearance and any project-specific acceptance criteria. Separate rejects or rework instead of allowing an unverified ring to continue as accepted output.
One-Off Personalization
When every ring carries different names, dates or artwork, data entry and size changeover may dominate the workflow. The setup should reduce loading mistakes and make the correct job identity easy to verify before marking.
Batch Production
When the same or controlled variable content is repeated across many rings, fixture repeatability, recipe control, inspection frequency and reject handling become more important than a single successful sample.
Sample Acceptance
How Should Ring Engraving Samples Be Accepted?
Test representative rings, including the difficult size or surface condition, and agree what “pass” means before the final machine configuration is fixed.
Appearance & Detail
- Required contrast or approved visual effect.
- Readable smallest text and acceptable logo/detail edges.
- Acceptable depth or surface effect for the stated requirement.
Geometry & Surface
- Correct position, orientation and inside/outside alignment.
- Acceptable continuity on curved or circumferential marks.
- No unacceptable fixture damage, heat tint or finish change.
Process & Production
- Stable holding and focus across representative ring sizes.
- Repeatable result over the agreed sample quantity.
- Full-cycle handling and verification compatible with the required production mode.
Test Result → Machine Configuration
How Do Sample-Test Results Determine the Final Machine Configuration?
The final system should be the simplest configuration that passes the agreed sample and production requirements. Each upgrade should solve a demonstrated process or handling need.
| What the Test Shows | Configuration Direction to Evaluate | Decision Logic |
|---|---|---|
| Small outside mark stays within a usable local area | Fixed fixture or standard marking setup may be sufficient | Do not add rotary hardware if the accepted mark does not need circumferential motion. |
| Mark must follow the circumference or continue around the ring | Rotary axis + suitable chuck or fixture | Rotation becomes a functional requirement of the accepted mark path. |
| Ring sizes vary widely | Adjustable chuck, interchangeable nests and/or a defined focus-height strategy | The configuration should maintain repeatable centering and focus across the actual size range. |
| Polished or plated surfaces show fixture marks | Protected-contact or custom fixture approach | Fixture design must preserve the approved surface condition while holding the ring securely. |
| Inside-band access is restricted | Change fixture orientation, working distance or optical-access strategy before adding complexity | Beam access is a geometry problem; a more advanced laser source alone does not solve blocked access. |
| Curvature creates unacceptable focus variation while optical access remains workable | Evaluate focus strategy, segmented marking or dynamic-focus/3D options where appropriate | Use the sample result to justify added focus control rather than assuming 3D is required for every ring. |
| Q-switched fiber passes all acceptance criteria | Keep the simpler Q-switched fiber route | A higher-spec source is not required when the simpler route already produces the accepted result. |
| MOPA testing gives a clearly better acceptable process window or surface result | MOPA fiber becomes justified | The source upgrade is tied to a demonstrated result, not to specification preference alone. |
| Every ring has different names, dates or serial data | Include the required software/data workflow and operator verification method | Variable data becomes part of the machine configuration and mistake-proofing logic. |
| Manual loading or checking is the main production bottleneck | Evaluate fixture optimization, multi-position handling or project-based automation | Automation level should follow the real full-cycle throughput requirement. |
Safety
Safety Considerations for Ring Laser Engraving
Ring engraving requires the same basic laser-safety, guarding and process-emission review as other industrial laser-marking operations.
Invisible Beam and Reflections
For 1064 nm fiber configurations commonly evaluated for metal rings, the processing beam is invisible. Highly polished surfaces can create specular reflections, so guarding and operator exposure need to be reviewed before testing.
Enclosure and Interlocks
An open or semi-open setup should not be treated as a Class 1 system by default. The complete machine must be reviewed for guarding, interlocks, access to laser radiation and emergency-stop design.
Smoke and Residue Control
Coatings, residues and polishing compounds may generate fumes or particulate during laser processing. Extraction and filtration should be selected for the buyer’s actual material and surface condition when the process requires it.
RFQ Inputs
What to Send for a Ring Engraving Evaluation
Send the information that defines the workpiece, target result and production requirement. The engineering test should determine whether rotary, special fixturing, focus control or another configuration is actually needed.
| Item | What to Provide | Why It Matters |
|---|---|---|
| Ring type and size range | Wedding/band, fashion, signet or other style; smallest and largest diameter; band width/profile. | Defines access, chuck/nest range and focus/positioning conditions. |
| Material and finish | Gold, silver or other metal/alloy if known; polished, brushed, plated, coated, oxidized or textured finish. | Changes laser response and the acceptable surface/process window. |
| Mark position | Inside band, outside band, edge, sidewall or a mixed route. | Changes optical access, rotary need and fixture orientation. |
| Mark content and smallest artwork | Name, date, initials, logo, serial number or decorative pattern, with real mark dimensions. | Sets the real detail/readability test instead of relying on oversized demonstration graphics. |
| Target result | Required appearance, contrast, depth, surface preservation, alignment/continuity and any durability test. | Creates the acceptance criteria used to compare laser routes. |
| Production mode | One-off personalization or batch work; typical batch size, daily quantity and required cycle if applicable. | Determines whether changeover, fixture repeatability or automation is worth evaluating. |
| Data and verification | Fixed artwork or variable names/serials; operator check, scan/check or other acceptance method if required. | Determines software/data workflow and production mistake-control needs. |
| Representative samples | Actual finished rings, including the most difficult size/finish conditions where possible. | Allows laser, focus, holding and finish risk to be tested together before final configuration. |
FAQ
Frequently Asked Questions
Can a laser mark inside a ring?
Yes, but inside-band marking must be tested for optical access, focus, band width, fixture orientation and holding stability on the actual ring size.
Do I need a rotary axis for every ring job?
No. Rotary is most relevant when the accepted mark must follow the circumference or remain consistent across a curved path. A local mark that stays within a usable area may not need rotation.
Should I choose Q-switched fiber or MOPA fiber for ring engraving?
Start from the alloy, finish and target result. Q-switched fiber can be a practical first test for many metal-ring tasks. MOPA is worth evaluating when its wider pulse-control window produces a useful improvement in surface appearance, thermal control or process tuning on the actual ring.
What should I send for a ring engraving sample test?
Send representative finished rings, the real mark artwork and size, the smallest/largest or most difficult ring conditions, the required appearance/depth, production quantity and any specific acceptance or verification requirement.
Ready for Sample Evaluation
Send the ring, target result and production requirement
Zhuorui can use the real ring size, material/finish, mark content and acceptance criteria to evaluate the first laser route, test the process and determine which machine configuration is actually justified.